Friday, August 6, 2010

Working With RHIDE

Start at the Beginning
Table of Contents

RHIDE is a type of program called an IDE - an Integrated Development Environment. It was written by a fellow named Robert Hoehne - RHIDE stands for Robert Hoehne's IDE, of course.

An IDE is a type of program designed for editing, managing, building, and debugging the source code of large programs. We won't be learning most of RHIDE's features - they're pretty outdated and fairly clumsy, so it's mostly useless knowledge. We'll just use it to edit our files.

To start, we need to change a pair of DOS configuration options. By default, only a very small number of files can be open at any one time in DOS. This can be a problem, particularly when compiling - the compiler ends up opening a lot of files behind the scenes without you knowing. So many files, in fact, that the default DOS limit of 20 isn't enough to compile anything but the simplest program. We'll have to fix it sooner or later, and we might as well do it now and get comfy with RHIDE.

(Of course, I could have done it myself, but I thought this would be a good exercise.)

I'm going to assume you're sitting in the root directory of the C drive. Your DOS prompt should say C:\>, in other words.

You have two options now. You could type rhide fdconfig.sys to start RHIDE and open the fdconfig.sys file automatically - but I'd like to show you a bit more of RHIDE's interface. So just type rhide and press Enter.

An "About" window will pop up. Press Enter to clear it. You should now be looking at an empty RHIDE workspace. There'll be a red dot in the middle of the screen - this is the mouse cursor. Bochs instructs you in the bottom left that holding CTRL and pressing down the third mouse button will enable the mouse - but frankly, I've never gotten the mouse to work right in Bochs. So just ignore it - I'm going to teach you to navigate RHIDE using the keyboard.


At the bottom of the screen is a list of shortcuts, there to remind you of the program's most essential keys. Some of the shortcuts are greyed out because we don't have a file open.

Press F3 to open a file.

You could now directly type in fdconfig.sys - white text on green is "highlighted" in RHIDE, and like in Windows, typing with text highlighted (as it is in the Name box) will replace it. Instead, however, press the TAB key once. Now command.com should be highlighted. You're inside a selection box - press up and down to scroll through it. Select fdconfig.sys and press TAB again. You'll see that the text on the Open button will turn white, meaning it's now highlighted. Press Enter and the file will open.

Navigating and typing in RHIDE should be somewhat intuitive - use the arrow keys, page up and page down, home and end to move around. Type to insert text, Delete and Backspace to get rid of it. You can't copy and paste the way you can in Windows, though - in RHIDE, the keys for cut, copy, and paste are:

CutShift+Del (hold down Shift, then with Shift still pressed, press Delete)
CopyCtrl+Ins
PasteShift+Ins

Next, we'll learn how to use the menu system. There's two ways to open the menus in RHIDE with the keyboard - you can either press Alt, like you can in Windows, or F10. If you press F10, you can navigate the main menu bar with the arrow keys, and press the down arrow or Enter to expand one of the main menus. If you press Alt, you need to press Alt+the red letter of the menu you want to open. For example, if you want to open the Search menu - which we do - you'll notice the S in search is red. So press Alt+S.

The Search menu should open. Press up and down a bit to move through the menu. To perform the highlighted action, press Enter. You'll notice that some menu options have a key combination next to them - this is a shortcut you can type if you want to perform that command without navigating through the menu. The red letters of the menu options let you perform a command without navigating to it using the arrow keys. For instance, pressing F activates the 'Find...' command, even if Find isn't highlighted.

Press 'F' now. We want to find something.

Type FILES into the 'Text To Find' box. Press TAB three times and the 'Origin' radio buttons should light up. Radio buttons let you choose one option from many. Press down to make 'Entire Scope' the selected option, then press Enter. Even though the 'OK' button is not selected, look at how it's coloured differently than the other buttons. This means it's the default button - when you press Enter, even if 'OK' is not selected, RHIDE behaves as though it was. The exception, of course, is when another command button is selected (as opposed to a text box or radio button) - then whatever command is mapped to that button will be executed.

You should now be at the line

!FILES=50

Change this to read

!FILES=200

You can either delete the 50 using the Backspace and Delete keys, or you can highlight it by holding down Shift and moving the cursor over it using the arrow keys. Then press Delete, and all at once it will be deleted.

You'll also need to change the BUFFERS setting to 200. Do this using the same method as we used before.

Hit F2 to save, then Alt+x to exit. You'll need to restart your virtual machine for these changes to take effect - but for now, I recommend just shutting it off. Press Power and take a break. Save the Review for tomorrow.

Wednesday, August 4, 2010

Working With DOS

Start at the Beginning
Table of Contents

DOS (short for Disk Operating System) is the distant ancestor of the modern Windows operating system. When your virtual machine starts up, it'll present you with a prompt that reads C:\>. This means that the current drive is the C drive (the virtual hard drive) and you're currently in the \ or root directory. In general, you'll always work on the C drive, except when I have you load data from a virtual floppy, which will be the A drive - you can switch to it by typing A: and pressing Enter, and back to the C drive by typing C: and pressing Enter. Of course, since you don't have a virtual floppy disk inside your virtual floppy drive, this won't work yet! I'll remind you of how to do this when the time comes.

Like on a modern computer, each disk drive is organized into directories (usually called "folders" these days) which contain files. In order to view the contents of the current directory, type dir and press Enter. If the directory listing is too long to fit on the screen, you can type dir /w (the /w switch is short for 'Wide'), which outputs the listing in three columns. If it's still too long, you can type dir /p (/p for 'Pages', or perhaps 'Paginate'), which will pause outputting the listing when it fills the screen, waiting for you to press a key before it continues. You can also combine the switches (à la dir /w /p) if you're so inclined.

The first thing we're going to do is make a directory to store all our code in. Type in mkdir gameprg and press Enter. This will create a new directory inside the current directory called 'gameprg'. View the directory listing using dir, and observe your new directory.

To change the current directory, you use the cd command. Enter the command cd gameprg and the prompt will change to C:\gameprg>. To go "upwards" into a parent directory, type

cd ..

If you do this inside C:\gameprg, for instance, it'll take you back to C:\.

Whenever you want to stop running Bochs, just hit the power button - in Bochs, not on your real computer! There was no need for a shutdown mechanism back then.

Tuesday, August 3, 2010

Setting Up Bochs

Start at the Beginning
Table of Contents

Bochs is, unfortunately, something of a bear to set up. I've done most of the hard work for you, but you'll still need to get involved a little.

Just like in a real computer, Bochs needs a hard disk. Because your computer is a real, physical thing, it has a real, physical hard disk. Because your Bochs "virtual machine" is a virtual thing, you'll need a virtual hard disk. This is a file on your (real) computer, a "hard disk image", that contains all of the stuctures of a real hard disk, plus all of your data.

I've created a virtual hard disk for you that contains a minimal installation of FreeDOS - the free implementation of DOS we'll be using - and DJGPP, the compiler we'll be using to take our source code and translates it into machine code that the computer can execute. Download it here. It's about 40MB.

First, extract 'c.img' from 'hdimg.zip' somewhere. Note - although 'c.img' is only around 40MB zipped up, it expands to around 1GB! That's because it's a 1GB virtual hard disk, of course. It's only so small zipped up because most of it is empty.

Next, put this Bochs configuration file into Bochs' directory. The Bochs default install directory is C:\Program Files\Bochs-2.4.5. If you had Bochs install Start Menu shortcuts like I recommended, there should be a shortcut to "Bochs 2.4.5 Folder" you can click on to find it.

Before we begin, you'll need to make a change to the configuration file - you'll need to tell Bochs where to find your hard disk image. Open the configuration file up in Notepad. If you're on Windows 7 or Windows Vista, you'll need to start Notepad in Administrative mode to do this. Right click on the Notepad shortcut in the start menu and click 'Run as administrator'.

Inside the configuration file, look for the line that says:

ata0-master: type=disk, path="C:\Users\Adam\c.img", mode=flat, cylinders=2080, heads=16, spt=63

You'll need to change the path here to point to where ever you extracted your hard disk image. So if you extracted it to C:\Documents and Settings\George\Desktop\c.img, change the line so that it reads:

ata0-master: type=disk, path="C:\Documents and Settings\George\Desktop\c.img", mode=flat, cylinders=2080, heads=16, spt=63

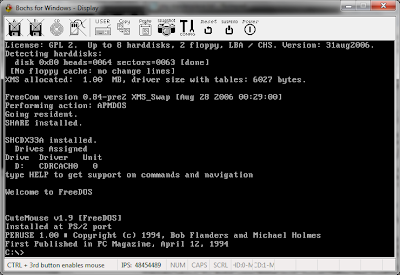
Save the configuration file and run Bochs. Click 'Start' and, if all went well, in a couple of seconds your brand new DOS computer should boot up! It should look something like this:


Previous

Monday, August 2, 2010

Installing Bochs

Start at the Beginning
Table of Contents

Bochs is a PC "emulator" - software that does what hardware inside a PC normally does. Explaining what exactly an emulator is and how it works is outside the scope of this book - but by the time you get to the end of it, not only will you understand much of the principles of emulation without me even needing to explain them to you, you'll probably have some ideas on how to write an emulator yourself.

Using Bochs, we're going to have a virtual PC running on top of your real computer. It'll have virtual floppy disk drives, a virtual hard disk, and you'll have have to virtually boot it up. When the virtual PC crashes, it only virtually crashes; it won't crash your actual computer - something you'll quickly grow to be thankful for, believe me.

No matter if you have a Windows PC, or a Mac, or even a Linux box, Bochs can run on your computer and create a virtual DOS machine on your desktop. This is another perk of using Bochs.

The only downside is that Bochs is slow - it has to take care of in software what the physical hardware of the PC normally does instantaneously. When a program would normally be telling the CPU to add two numbers together, Bochs instead has to intercept and interpret that message, then tell the real CPU to do it, then report the result back to the program. You're adding a layer of indirection.

This is okay though, because we're pretending that we're developing for a slow computer anyways. Bochs is still more than fast enough for our needs, and because of how low-tech the software on our Bochs machine is, it'll still probably be more responsive than a modern desktop. DOS only takes a couple of seconds to start up, for instance.

Unfortunately, setting up Bochs is tricky on a Mac, and I don't have one right now. The following directions are for Windows PC only. Hopefully I'll have Mac directions up soon. If you're on Linux, the installation process varies depending on the distribution you're running; but Bochs should be in your repositories - and if you're on Linux, you probably don't need me to tell you what that means.

To download Bochs, go to the Bochs website and click on 'See All Releases' in the menu on the left. When I wrote this, I used the latest version of Bochs, 2.4.5. Even if, by the time you read this, newer releases of Bochs are available, I recommend you use 2.4.5 - otherwise, no guarantee on how well my disk images and configuration files will work.

The file you want should be called Bochs-2.4.5.exe. If you're reading this in the
present day, it'll be under Newest Files. If you're from the future, you might need to scroll down and click on the 2.4.5 folder first.

Download the install file and run it. First, it will ask you if you agree to the license Bochs is published under. Legally, I'm obligated to tell you to read it before you click 'I Agree'. There's nothing bad in there, don't worry. If you don't agree to the terms, you can't use Bochs - and if you can't use Bochs, you can't follow along with this book, so a lot is riding on it!

Next, you'll need to choose what components you install. Frankly, it doesn't really matter - even a full install is tiny on a modern computer, and even the most minimal set up will work for our purposes. Here are my recommended settings:


Bochs will then ask you for an install location. The default should work, but feel free to change it if you'd like. If you do change it, be sure to make a note of where you change it to. Once you've set the install location to your liking, click 'Install'.

When the install completes, click the 'Close' button. The Bochs installer will ask you if you want to see a list of changes - if you're curious, go ahead and click 'Yes' - but really, there's no need. Nor do you need to read the README, which it'll ask you about in the next message box. Click 'OK' at the "Thank You" message, and you'll be finished installing Bochs.

Our Development Environment

Start at the Beginning
Table of Contents

CHAPTER I - Getting Started

Modern computers with their modern operating systems (OS, like Windows or Mac OS X) are hugely complex pieces of engineering. In order to even begin to write a C++ DirectX Windows game, you need hundreds of lines of boilerplate code and a deep understanding of dozens of weird technologies. It's not interesting, really, and it's extremely confusing for a beginner.

The advantages are that it's safer - you're unlikely to blow up your computer with the protection Windows provides. You also don't need to worry too much about compatibility - a DirectX game should work on basically any Windows computer, no matter what kind of hardware is inside it.

A mixed blessing is that DirectX and modern graphics cards take care of many of the little details of game programming we used to have to do ourselves. While this is less work, those searching for a deeper understanding of game programming won't really find it. The complex, mysterious machinations of the modern development environment tuck you in and tell you that you'll understand when you're older, basically. While this sort of abstraction is a great thing on the whole, and I have no intention to slight it, I also feel that a deep understanding is crucial to being a truly skilled and capable programmer.

To that end, we're going to travel back in time to around 1992. The 386, running at 33MHz, is becoming the most popular CPU on the market, executing a blistering 11 million instructions per second (MIPS). By comparison, a modern CPU runs at around 3GHz (that's around 100x faster) and executes nearly 150,000 MIPS. Right now we run Windows 7 on our computers - back in 1992, most computers ran DOS, an ultra-minimal, text-only environment. A modern computer might have 4GB of RAM. Back then you were lucky if you had 4MB (around 1000x less). A modern computer has around 1TB of hard disk space. Back then, you might have 100MB - that's 10,000x less! It's on a computer like this that we're going to learn.

Here, we need to do everything ourselves - talk directly to the hardware to make it do our bidding. We'll need to learn the basic math to draw geometric shapes. We'll need to write our own code to unpack images from files. We'll need to carefully feed chunks of sound to the sound card to play music. Only once we get this deep understanding of all the different problems we need to solve in order to make a game can we understand how masterpieces like Doom and Quake were made - and only once we've unpeeled these masterpieces and figured out how people could possibly put them together can we possibly put masterpieces like them together ourselves.

Of course, you probably don't have an old 386 sitting around. Happily we can create a "virtual" 386 using free software, running inside a window on our modern desktops. To do this we'll use Bochs, a free and open source PC emulator, and FreeDOS, a free and open source implementation of DOS. To compile our C code into programs we can run, we'll use DJGPP, a venerable DOS port of the free GCC compiler. This is the same compiler used to build Quake nearly 15 years ago, and it's only gotten better since.

Sunday, August 1, 2010

Introduction To Volume I

Start at the Beginning
Table of Contents

Volume I is a look backwards to the origins of PC game programming. Although we're not going all the way back to the primordial ooze of x86 assembly and CGA register hacking, we're going back far enough to give you an idea of what it's like to do it all yourself - living with minimal support from the operating system, directly poking and proding at the hardware, writing your own rasterisation routines, and so on. This environment is much simpler, making it easier to learn on and understand. But it'll also put hair on your chest. It's a world without shortcuts - where if you want anything, you'll need to squeeze it out of the hardware with your bare hands. It teaches both the skills and the mindset that you'll need to be a serious game programmer. It's very much a first principles sort of thing.

Little knowledge is presumed. Of course, the more you have, the easier going you'll find things. The most important thing is to take the material slowly and carefully, rather than skimming through; I'm going to make it a point to explain everything as it comes up in detail, rather than just gloss over matters to expedite things. We're going to learn low-level details about the PC hardware, some pretty cool math, and the C programming language, amongst other things. The aim is to be comprehensive and complete. My hope is that a clever but completely uneducated kid would be able to work through this book by themselves on the weekends and come out of it with the skills needed to make the next Quake. You'll need to be able to solve basic algebraic equations, and that's about it.

I love theory but hate learning theory. My preference is to never introduce a topic via a long, dry explanation of its precise semantics; instead, I'll try to explain it as I go in the context of a practical application. Even when I do feel the need to explain something before you see it in action, I'll try to make sure there's always a practical application at least in mind. It's similar to immersion style courses for language learning, which I've always found effective; it's easier to learn something precisely after you have an intuitive understanding of it.

This is primarily a course on code reading, a woefully underappreciated skill. Instead of forcing you to write your own code unequipped with the knowledge of how to do it properly, you'll instead be asked to closely and carefully understand complete, practical code samples. These heavily-annotated code samples introduce and explain most of the key concepts in the book. The size and complexity of the programs presented for reading accelerates quickly; this aggressive immersion is necessary, given the depth and breadth of the material presented, to get the reader up to speed quickly. Everything will be recapitulated in a review section at the end of each chapter; take a day before reading them and they'll reinforce the preceeding material.

This is the beginning of a long, hard journey. Take your time. Take things slowly. We're lucky to live in the age of Google and Wikipedia - research things you don't understand or are curious about. Play around with the code. Have fun. That's what games are all about.

Table Of Contents

GAME PROGRAMMING FROM THE GROUND UP

Forward

VOLUME I

Introduction to Volume I

CHAPTER I - Getting Started


CHAPTER II - Mode 13h