Start at the Beginning
Table of Contents
The other advantage of double buffering is that it prevents what's called 'tearing'. Back in the day, everyone used CRT (cathode ray tube) monitors instead of the LCDs we use today. Inside these monitors was an electron gun that would light up pixels by running an electron beam down the screen extremely quickly. Once it reached the bottom, it'd move back up to the top before drawing the next frame. The time the electron gun takes to move back up to the top is called the vertical blank period or vblank.
If we start drawing a new frame to the screen while the monitor is in the middle of drawing, half the screen will be the previous frame, and the other half will be the next frame. If things are moving quickly, this creates a weird visual effect called "tearing". If we wait until the monitor is in vsync before drawing our frame, we can avoid this entirely - as long as the drawing takes less time than the vblank. Without double buffering, it might not if we're drawing a particularly complex scene and waiting until vsync before we start. If, instead, we draw away on our back buffer, the quick copy operation is all we have to do in vblank, and that's almost guaranteed to finish in time.
Even though LCD monitors don't quite work this way, this approach is still required. LCD pixels never have to be refreshed, but the monitor queries the VGA for the current contents of the graphics array every so often and only redraws the actual physical screen then. If we're in the middle of drawing when that happens, we'll get tearing.
On a VGA card, vblank occurs 70 times per second. Thus, waiting for vblank also gives us a way to prevent our game from running too fast - but it does limit us to 70fps. This makes our lives easier in a lot of ways, but it is limited. Eventually we'll learn ways around this.
Here's the function we'll use to wait for vblank:
(click here for vblank.c)
Wednesday, September 8, 2010
Wednesday, August 25, 2010
Double Buffering
Start at the Beginning
Table of Contents
My preferred approach for drawing pixels (and thus images) to the screen is something called double buffering. I prefer it because it's simple, it's fast, and because we'd need to implement it eventually anyways (I'll explain why in the next section).
With double buffering, we draw our screen image into a block of memory we handle ourselves, and then we blast it into video memory as quickly as possible. We only need to deal with the vestigal 16-bit memory layout once, when we do that fast copy - but happily, there's a built in function that manages it all for us.
For the record - while I'm writing this book from first principles to try to engender a deep understanding of the concepts, and normally I'm opposed to this sort of "just let the computer do it" handwaving - here I'm interested in teaching game programming concepts, not completely worthless, x86-specific processor tinkering concepts. No one should have to know this anymore unless they're writing an OS. No one should have ever had to know this!
To implement double buffering, first we'll need to create our "back buffer". The back buffer is a chunk of memory exactly like the one in video memory where the VGA stores the screen, except that it's in our address space - meaning it's memory we can access whenever and however we want.
#define SCREEN_WIDTH 320
#define SCREEN_HEIGHT 240
/* here, we allocate a global array to store our screen buffer. An array is basically a chunk of memory that stores a series of items of the same type. Here, it stores a series of bytes representing the pixels that form the image on-screen. There's a slot for each pixel on the screen, so to compute the total number, we compute SCREEN_WIDTH*SCREEN_HEIGHT */
unsigned char screen_buffer[SCREEN_WIDTH*SCREEN_HEIGHT];
Then we need a way to copy this back buffer into video memory. To do this we'll use a function DJGPP (our compiler) provides called dosmemput(). dosmemput() is non-standard (meaning it'll only work with DJGPP on DOS, not with other compilers or operating systems) function that can copy a large chunk of data to anywhere in memory quickly - even outside of our program's address space, into places like video memory. The call we'll use to actually copy our back buffer will look like this:
That means we're copying SCREEN_WIDTH*SCREEN_HEIGHT bytes from screen_buffer to 0xA0000 - where the VGA stores the screen. Now we can write to our back buffer as much as we want, quickly and easily. When we're done, we copy the back buffer over to put it on screen:
Previous
Table of Contents
My preferred approach for drawing pixels (and thus images) to the screen is something called double buffering. I prefer it because it's simple, it's fast, and because we'd need to implement it eventually anyways (I'll explain why in the next section).
With double buffering, we draw our screen image into a block of memory we handle ourselves, and then we blast it into video memory as quickly as possible. We only need to deal with the vestigal 16-bit memory layout once, when we do that fast copy - but happily, there's a built in function that manages it all for us.
For the record - while I'm writing this book from first principles to try to engender a deep understanding of the concepts, and normally I'm opposed to this sort of "just let the computer do it" handwaving - here I'm interested in teaching game programming concepts, not completely worthless, x86-specific processor tinkering concepts. No one should have to know this anymore unless they're writing an OS. No one should have ever had to know this!
To implement double buffering, first we'll need to create our "back buffer". The back buffer is a chunk of memory exactly like the one in video memory where the VGA stores the screen, except that it's in our address space - meaning it's memory we can access whenever and however we want.
#define SCREEN_WIDTH 320
#define SCREEN_HEIGHT 240
/* here, we allocate a global array to store our screen buffer. An array is basically a chunk of memory that stores a series of items of the same type. Here, it stores a series of bytes representing the pixels that form the image on-screen. There's a slot for each pixel on the screen, so to compute the total number, we compute SCREEN_WIDTH*SCREEN_HEIGHT */
unsigned char screen_buffer[SCREEN_WIDTH*SCREEN_HEIGHT];
Then we need a way to copy this back buffer into video memory. To do this we'll use a function DJGPP (our compiler) provides called dosmemput(). dosmemput() is non-standard (meaning it'll only work with DJGPP on DOS, not with other compilers or operating systems) function that can copy a large chunk of data to anywhere in memory quickly - even outside of our program's address space, into places like video memory. The call we'll use to actually copy our back buffer will look like this:
dosmemput(screen_buffer, SCREEN_WIDTH*SCREEN_HEIGHT, 0xA0000);
That means we're copying SCREEN_WIDTH*SCREEN_HEIGHT bytes from screen_buffer to 0xA0000 - where the VGA stores the screen. Now we can write to our back buffer as much as we want, quickly and easily. When we're done, we copy the back buffer over to put it on screen:
/* imagine we have some constant RED defined for a red pixel.
This line would make the very top left pixel red */
back_buffer[0] = RED;
/* This line would make the pixel to the right of it red */
back_buffer[1] = RED;
/* And this would make the pixel below it red.
Each row has 320 pixels, and the rows are stored top to
bottom, one after the other */
back_buffer[320] = RED;
/* now copy the back buffer to the screen */
dosmemput(screen_buffer, SCREEN_WIDTH*SCREEN_HEIGHT, 0xA0000);
Previous
Monday, August 23, 2010
Plotting Pixels (In Theory)
Start at the Beginning
Table of Contents
The VGA stores the contents of the screen in memory in segment 0xA0000. In theory this means we could just write directly into 0xA0000 to draw on the screen as easily as by assigning variables.
...What exactly segment 0xA0000 is, unfortunately, can only be answered by explaining the x86 architecture's archaic and obsolete 16-bit memory layout. By default, our compiler inserts code into our program that, at start up, lets us use a much more modern, 32-bit memory layout introduced with the 386 processor. This has many perks, but unfortunately it also makes difficult to write directly into video memory the way we could in 16-bit mode.
There are a few solutions. The first is to take advantage of a BIOS function that plots a pixel, much in the same way that we switched video modes before. Here's the code:
(click here for slowpix.c)
The only problem with this is that it's slow. Plotting pixels is something we'll be doing a lot of, so our pixel plotting routine needs to be as fast as possible. This solution just won't fly.
Another approach is to use a number of tricks our compiler provides to write directly into video memory, as hard as that is in the 32-bit world. This introduces a lot of complexity I'd like to avoid - because it's hard to understand, and because I don't want to have to explain all of it!
Instead, we'll be using a technique called double buffering.
Wednesday, August 18, 2010
Tuesday, August 17, 2010
Switching To Mode 13h (In Practice)
Start at the Beginning
Table of Contents
The following is a complete C program that switches into mode 13h then back into text mode. Anything between /* and */ is a comment - the compiler ignores it. We use it to describe exactly what the program is doing when the code itself is unclear. Read the following program closely, including all the comments.
(click here for setmode.c)
Type the above program out in RHIDE and save it to a file called setmode.c. You don't need to copy the comments - in fact, a better thing to do is replace my comments with your own, explaining your own understanding of the code. This will force you to think hard about it.
Now we're going to 'compile' our code. Compilation is the process of taking source code, analyzing it, and turning it into machine code the computer can load and execute. As our program gets more complex, we'll need to have a more involved compile step. For now, it should be fairly simple.
gcc setmode.c -o setmode.exe
gcc is the name of DJGPP's compiler. setmode.c is the name of the file you want to compile, of course. The -o stands for output - it tells GCC where to output the result of compilation.
If it worked, GCC won't display anything. If it outputs an error, check your code, find the mistake, and try again. GCC's error messages tend to be cryptic, but they do tend to lead you in the right direction. To see what I mean, let's fake an error message. Go to line 55:
set_video_mode(TEXT_MODE);
and change it to read
set_video_mode(TXT_MODE);
That is, remove the E in TEXT.
You'll get the following output:
setmode.c: In function 'main':
setmode.c:55: error: 'TXT_MODE' undeclared (first use in this function)
setmode.c:55: error: (Each undeclared identifier is reported only once
setmode.c:55: error: for each function it appears in.)
Now, the first thing to understand is that this is all one error message. The first line tells you the following errors are all inside main(). The next three lines are just GCC splitting the error message up. So the error really is:
setmode.c:55: error: 'TXT_MODE' undeclared (first use in this function) (Each undeclared identifier is reported only once for each function it appears in.)
So this should be clear. The error is in video.c on line 55. The problem is GCC doesn't know what TXT_MODE is. It's undeclared, because we didn't declare TXT_MODE - we declared TEXT_MODE! You need to be very precise with computers. Change TXT_MODE back to TEXT_MODE and it should compile without a hitch - as long as you don't have any errors of your own to fix.
Running the program - by typing setmode at the DOS prompt - should do pretty much nothing (it'll clear the DOS back buffer, actually). That's because all our program does is change video modes and instantaneously switch back. It doesn't wait around in the new video mode or draw anything to the screen in the new video mode. We'll get there soon.
Monday, August 16, 2010
Switching To Mode 13h (In Theory)
Start at the Beginning
Table of Contents
To switch into Mode 13h, we load register AH with 0 to specify a video mode switch; load register AL with 0x13, the video mode we want to switch into; and then call interrupt 0x10, which handles graphics functions. Simple, right?
Not really. To understand what all this means, you need to understand a bit about CPUs. Basically, the CPU can only operate on data that it has loaded into tiny, special pieces of onboard (i.e. on the CPU) memory called registers. To execute a simple line of code like
y = y + 5;
the CPU will first load the contents of y from wherever it's stored in memory into a register, add 5 to it, and then copy it back to the memory location that corresponds to y.
Two of the registers on x86 CPUs (the type of CPUs in most desktops these days, and the type of CPU we're programming for) are called AH and AL. They each hold a single byte. They're actually each one half of a larger register called AX. There's also BX, CX, DX (and their respective half-registers), SP, SI, DI, BP, CS, DS SS, ES...and so on. The world of low-level coding on the x86 architecture is deeply messy and unpleasant. Be happy your compiler takes care of shuffling data from memory to the registers and back again.
When you send an 'interrupt' to the CPU, the CPU stops whatever it's doing and executes whatever code is assigned to that interrupt. Most code these days doesn't ever need to deal with this, but it's a useful way to give programs access to system functions. The BIOS is a set of functions like this, stored in ROM on the motherboard, that are accessed via interrupt. Interrupt 0x10 is reserved for graphics functions - the precise function selected is determined by whatever number is in AH. 0 is the "switch video mode" function. It switches the computer to whatever video mode corresponds to the number in AL. Since we want to switch to mode 13h, we store 0x13 in AL.
Thursday, August 12, 2010
Mode 13h
Start at the Beginning
Table of Contents
Mode 13h is the name of the 'graphics mode' most classic DOS games ran in. Telling the computer to go into Mode 13h caused it to set the screen resolution to 320x200, and to use the screen format described above - 8 bits per pixel using a palette, 18 bits per palette entry.
Old computers used a standard graphics system called the VGA - short for Video Graphics Array. It had a number of graphics modes, each with their own dedicated number. Standard DOS text mode is mode 3. Mode 13h is the mode we'll be using in this volume, for the sake of simplicity and nostalgia. The 'h' after 13 means that 13 should be read as a hexadecimal number. In decimal, that's:
1x16^1 + 3x16^0
= 16 + 3
= 19
An alternate representation of hexadecimal numbers, the one used by the C programming language, is prefixing them with 0x - e.g. "we're going to tell the computer to switch into Mode 0x13".
Wednesday, August 11, 2010
Colour Depth
Start at the Beginning
Table of Contents
One other thing to know about computer graphics. On modern computers, each pixel's colour is stored in a 32-bit number. Each colour is stored as a measurement of the intensity of three fundamental colours - red, green, and blue, which are then blended together to form the final colour. Each of these measurements are 8 bits (1 byte). A pixel with 255 for red and 0 for green and blue would be a bright red; a pixel with 255 for red, green, and blue is white; a pixel with 0 for all of the different colour channels is black. The final byte of the colour typically is used to describe how transparent the pixel is (this is called the alpha value of the colour). That way, when drawing two images over top of each other, by performing some computations the computer can modify the colour it draws to make one image appear visible through the other.
Since my computer has a resolution of 1280x1024, that means there are
1280x1024 = 1310720
pixels on my screen. At 32 bits (or 4 bytes) per pixel, that means my screen takes 5242880 bytes to store. A KB (kilobyte) is 1024 bytes, and a MB (megabyte) is 1024KB or 1048576 bytes. My screen alone, then, requires around 5MB to store! Before around 1993, most computers didn't have this much memory for storing *everything* - all the programs and files you had loaded, numbers required for calculations, etc. - much less just to store the screen data. Of course, resolutions were smaller back then, but tricks were still needed to squeeze everything into memory.
One of these tricks is using a 'palette'. Rather than representing each pixel as 32 bits, we'll use only 8. This means we get 256 different colours to choose from per pixel. While we could just store the Red-Green-Blue-Alpha (RGBA) data using only 2 bits per channel, this wouldn't give us a great deal of flexibility regarding the colours we use. Instead, we'll choose 256 colours using 32 bits each and store them in a palette - a list of colours we're using. Because there's only 256 of them, even though we're using 32 bits per colour, it's still significantly smaller than using 32 bits for the thousands of pixels on screen. Suppose our resolution is 320x200. Using 32 bits per pixel, we're using:
320x200x4 bytes per pxiel = 256000 bytes
...around 256KB. Using a palette, we use only:
320x200x1 byte per pixel + 256 colours * 4 bytes per palette entry = 65024 bytes
...around 64KB. We're using only a quarter of the space we were using before; this was a significant saving when memory was expensive as it was. In fact, old computers tended to use only 6 bits per channel, and not store any alpha information whatsoever - meaning each palette entry was only 18 bits. So the size of the palette was smaller still.
Tuesday, August 10, 2010
Number Systems And Memory
Start at the Beginning
Table of Contents
A bit is a digit in the binary number system. We traditionally use the decimal number system, where each digit is a number from 0-9. Consider the number 325. What this actually means is:
300 + 20 + 5
= 3x100 + 2x10 + 5x1
= 3x10^2 + 3x10^1 + 3x10^0
x = 5;
y = 7;
x = x + y;
This puts 5 into x's memory cells and 7 into y's. Then it pulls those numbers out of x and y's memory cells, adds them up, and puts their sum back into x's memory cell. The old value of x is gone.
Comfort with the binary number system is fairly important for programming. The hexadecimal number system (base 16) is also important - here, we use the standard base 10 digits, plus A-F inclusive to represent the decimal numbers 10-15 inclusive. Why is this important for programmers? Convenience of representation. What's the largest number you can store with two hexadecimal digits?
Table of Contents
A bit is a digit in the binary number system. We traditionally use the decimal number system, where each digit is a number from 0-9. Consider the number 325. What this actually means is:
300 + 20 + 5
= 3x100 + 2x10 + 5x1
= 3x10^2 + 3x10^1 + 3x10^0
(10^2 is another way of writing 10²)
For each "place" we move to the left, the exponent on 10 increases by one. The use of 10 here means that we're using a "base 10" number system, which is traditionally called the decimal number system. Note that there are 10 digits in the base 10 number system: 0, 1, 2, 3, 4, 5, 6, 7, 8, and 9.
In the binary number system, there are 2 digits: 0, and 1. Consider the 9-bit binary number 101000101b (the b simply signifies that this is a binary number). Using the same logic as above, this equals:
1x2^8 + 0x2^7 + 1x2^6 + 0x2^5 + 0x2^4 + 0x2^3 + 1x2^2 + 0x2^1 + 1x2^0
By computing this, we can convert to base 10:
1x256 + 0x128 + 1x64 + 0x32 + 0x16 + 0x8 + 1x4 + 0x2 + 1x1
= 256 + 0 + 64 + 0 + 0 + 0 + 4 + 0 + 1
= 325
The largest number that can be stored in 8 bits is 255 or 11111111b. The largest number that can be stored in 16 bits or 2 bytes is 65535.
In computing, we tend to call clusters of 8 bits a 'byte'. This is the smallest chunk of data that most modern computers can easily work with. Memory in a computer is basically a collection of numbered, byte-sized cells. You can put any byte-sized number into a memory cell and recall it later when needed. Each cell is labelled with a number called an 'address'. In the C programming language, we have 'variables', which are names for a memory cell or a group of memory cells holding a piece of data. The computer automatically decides on which cell(s) it aliases, usually, so we don't ever need to worry about that. We can just say:
int x, y;
...to declare a pair of variables called x and y that will hold integers (n.b. ints in C on a 386 are 4 bytes) . The C compiler will choose memory cells for x and y for us. To use the variables, we might write something like:
x = 5;
y = 7;
x = x + y;
This puts 5 into x's memory cells and 7 into y's. Then it pulls those numbers out of x and y's memory cells, adds them up, and puts their sum back into x's memory cell. The old value of x is gone.
Comfort with the binary number system is fairly important for programming. The hexadecimal number system (base 16) is also important - here, we use the standard base 10 digits, plus A-F inclusive to represent the decimal numbers 10-15 inclusive. Why is this important for programmers? Convenience of representation. What's the largest number you can store with two hexadecimal digits?
Monday, August 9, 2010
The Size of Pixels
Start at the Beginning
Table of Contents
The screen I'm typing this on is a grid of 1280 pixels across and 1024 pixels. We say that my screen has a 'resolution' of 1280x1024. My screen has a diagonal of 19" and it is 3/4 times tall as it is wide - that is, it has a ratio of 4:3.

We're going to use the Pythagorian theorem to determine the width and height of my monitor in inches. The Pythagorian theorem states that the square of the diagonal of a right triangle (one with a 90° angle) is equal to the sum of the squares of its other two sides. It's one of the single most important mathematical formulas ever discovered, and there exist dozens of proofs of it - look some up if you get a chance!

Let the width of my monitor be a.
Let the height of my monitor be b.
As the ratio of my monitor is 4:3, b = 3a/4
The diagonal of my monitor is 19"
Consider the following diagram:

And modern computers run at more than twice the resolution of the right screenshot. The point is this - as resolution increases, the amount of work required to render increases - but so do visual sharpness and detail. It's a trade-off.
Table of Contents
The screen I'm typing this on is a grid of 1280 pixels across and 1024 pixels. We say that my screen has a 'resolution' of 1280x1024. My screen has a diagonal of 19" and it is 3/4 times tall as it is wide - that is, it has a ratio of 4:3.
(A computer monitor is a grid of very tiny pixels)
We're going to use the Pythagorian theorem to determine the width and height of my monitor in inches. The Pythagorian theorem states that the square of the diagonal of a right triangle (one with a 90° angle) is equal to the sum of the squares of its other two sides. It's one of the single most important mathematical formulas ever discovered, and there exist dozens of proofs of it - look some up if you get a chance!
(the Pythagorean theorem in action)
a² + b² = c²Let the width of my monitor be a.
Let the height of my monitor be b.
As the ratio of my monitor is 4:3, b = 3a/4
The diagonal of my monitor is 19"
Consider the following diagram:

(half of a rectangle - like a computer screen - is a right triangle)
By the Pythagorean theorem:
a² + (3a/4)² = 19²
Using basic algebra, we can solve for a.
a² + 9a²/16 = 361 (compute the squares)
16a² + 9a² = 5776 (multiply both sides by 16 to eliminate the fraction)
25a² = 5776 (simplify the left side)
a² = 231.04 (divide both sides by 25)
a = ±15.2 (take the square root of both sides)
As a is a length, a cannot be negative. Therefore a = 15.2. Thus, my monitor is 15.2 inches wide. And as b = 3a/4
b = 3(15.2)/4 (substitute a)
b = 45.6/4 (multiply numerator)
b = 11.4 (divide)
Therefore my monitor is 11.4 inches tall. If we check 15.2/11.4 on a calculator, we get 1.333..., which is 4/3. Thus, the ratio between these two measurements is, as it should be, 4:3.
Knowing this, we can compute the size of each pixel on my screen. As there are 1280 pixels distributed across 15.2 inches, each pixel is
15.2/1280 = 0.011875"
...or around 0.3mm across! That's smaller than a grain of sand.
Older computers tended to have lower resolution screens. That's because the more pixels you have on the screen, the more memory is required to keep track of them all, and the more work it takes to set all of them. But reducing the resolution has a drawback, too. Imagine my screen had a resolution of 320x200. Then each pixel would be:
15.2/320 = 0.0475"
...across - far larger than it is on my high-resolution screen. Although 0.0475" still sounds very small, the difference is extremely noticeable. Fewer pixels on screen means images are less detailed and look "chunkier". Consider the following screenshots of Quake:


(Left - Quake running at 320x240. Right - Quake running at 640x480. Click for detail)
And modern computers run at more than twice the resolution of the right screenshot. The point is this - as resolution increases, the amount of work required to render increases - but so do visual sharpness and detail. It's a trade-off.
Sunday, August 8, 2010
What Graphics Are Made Of
Start at the Beginning
Table of Contents
CHAPTER II - Mode 13h
Graphics on your computer are made of tiny dots called 'pixels' (short for picture elements). Each pixel has a colour. In our modern age they're so close together and so tiny that they're effectively invisible on their own - grouped together, they seem to form shapes, images, and text. Animation is produced by changing the images these pixels form very quickly. Each image is called a 'frame'; films are projected at 24 frames per second (fps), TV at 30fps, and modern computer screens at around 60fps.

(A screen shot of Super Mario Bros. on the left with an enlarged view on the right, so you can see how the image is formed from pixels)
Saturday, August 7, 2010
Chapter I Review
Start at the Beginning
Table of Contents
This review will be on DOS and RHIDE.
When a DOS computer boots up, it places you at the command prompt. From here you'll navigate your disks, manage files and directories, and start programs.
Every disk in your computer is assigned a letter. On the virtual machine we're using, we're only going to have one primary disk: C, our hard drive. Occasionally I'll have you load a file from the A drive, a floppy disk drive.
At all times DOS keeps track of the current disk drive you're working with. To change drives, type the drive letter you want to change to, followed by a colon, followed by Enter. For example, to change to a hypothetical H drive, you would type H: and press Enter.
If DOS can't change to a disk drive (for example, if you try to change to the A drive if no disk is in the drive) it will display an error messaging asking whether to Abort, Ignore, Retry, or Fail. If you can fix the problem (e.g. by inserting a disk), you can use Retry (press R) to complete the operation. Abort, Ignore, and Fail all do basically the same thing - cancel the operation and leave you with no current disk (the prompt will just say >). Switch back to the C drive by typing C:
Your disk in DOS is a hierarchy of directories. Each directory can contain other directories as well as files. All directories on a disk are contained inside the root directory, \.
When working in the command prompt, you have a "current directory". This indicates where you are in the directory heiarchy. The command prompt shows you your current directory and your current drive. For example, when you first start your virtual machine up, the current drive will be C and the current directory will be \. The prompt, therefore, will read:
C:\>
If you were in the "myfiles" directory on drive A, the prompt would read:
A:\myfiles>
To view the contents of the current drive and directory, type 'dir' followed by Enter (from now on, when explaining a DOS command, I won't tell you that you have to explicitly press Enter. You always do though - the Enter key is what tells DOS to actually perform the command).
The dir command can also take switches. Type dir /w to get a columnar view, dir /p to get a paginated view, or dir /w /p (or dir /p /w - the order of switches doesn't matter) to combine the two.
Everything DOS does is relative to the current directory. For example, suppose the root directory on a floppy in drive A contains a directory (a subdirectory) called 'files', containing a file called 'a_file'. If the current directory is the root and the current drive is A, we can display the contents of 'a_file' with the command
type files\a_file
But if the current directory is 'files', then we only have to type
type a_file
And if we're on another drive entirely, we'll need to type
type A:\files\a_file
To change the current directory, type cd, followed by a space and the directory you wish to change to. For example, to change to the directory 'gameprg', you would type cd gameprg - assuming 'gameprg' is a subdirectory of the current directory. To jump back up to the parent directory of a subdirectory, type
cd ..
Typing this while in the root directory has no effect.
DOS has several built-in commands like 'cd' and 'dir' that can be typed anywhere. If DOS doesn't recognize the first "word" of your input as a built-in command, it tries to find a program with that name appended with one of the "extensions" .EXE or .COM in the current directory (i.e. if you type in rhide, it will look for 'rhide.exe' or 'rhide.com'). EXE and COM stand for EXEcutable and COMmand, respectively. If it can't find anything in the current directory, it'll check for a special "environment variable" (basically a DOS setting you can change) called PATH. PATH should contain a list of directories that contain programs that can be run from anywhere. If the program you ask for isn't in the current directory, it'll check each of the directories in the PATH for it. If it can't find it in there, DOS displays an error.
The program we'll be using most often is called RHIDE. The EXE for RHIDE is stored in the C:\DJGPP\BIN directory, and is called rhide.exe. Because C:\DJGPP\BIN is in the PATH variable (you can see this by typing set at the DOS prompt), you can run RHIDE from anywhere - just type rhide. DOS will find rhide.exe in C:\DJGPP\BIN, load it into memory, and give it control of the computer. When you quit RHIDE, it hands control back to DOS.
Optionally, you can ask RHIDE to load a specific file automatically by typing rhide followed by the name of the file you want to load. For instance, if you want to load the file 'main.c' into RHIDE, you'd type
rhide main.c
Here, 'main.c' is what we call a "command-line argument".
The two most helpful keys in RHIDE are F2 to save and Alt+X to quit. Other useful commands are displayed on a banner running across the bottom of the screen.
You can navigate around a file with the usual combination of arrow keys and Home/End/PageUp/PageDown. As you'd expect, typing letters inserts them into the file. Delete and backspace removes characters from a file. F10 opens the main menu bar. Alt+(a menu hot key) opens a specific menu. Arrow keys move around menus. The Enter key activates a menu option. TAB navigates through the various widgets in a window box. Cut, copy, and paste are Shift+Del, Ctrl+Ins, and Shift+Ins, respectively.
Try exploring RHIDE and the various options it presents to you. Look up short cuts in the menu. Navigate different menus and windows. Create a new file, type something up, play around with RHIDE's commands. Experiment. Even if you accidentally screw something up terribly - and that's fairly unlikely - just exit Bochs and replace your virtual hard disk image with a fresh copy (remember to change the FILES and BUFFERS settings again).
Now's the time to get comfy with your editor. We're going to be seeing a lot of it.
Friday, August 6, 2010
Working With RHIDE
Start at the Beginning
Table of Contents
RHIDE is a type of program called an IDE - an Integrated Development Environment. It was written by a fellow named Robert Hoehne - RHIDE stands for Robert Hoehne's IDE, of course.
An IDE is a type of program designed for editing, managing, building, and debugging the source code of large programs. We won't be learning most of RHIDE's features - they're pretty outdated and fairly clumsy, so it's mostly useless knowledge. We'll just use it to edit our files.
To start, we need to change a pair of DOS configuration options. By default, only a very small number of files can be open at any one time in DOS. This can be a problem, particularly when compiling - the compiler ends up opening a lot of files behind the scenes without you knowing. So many files, in fact, that the default DOS limit of 20 isn't enough to compile anything but the simplest program. We'll have to fix it sooner or later, and we might as well do it now and get comfy with RHIDE.
(Of course, I could have done it myself, but I thought this would be a good exercise.)
I'm going to assume you're sitting in the root directory of the C drive. Your DOS prompt should say C:\>, in other words.
You have two options now. You could type rhide fdconfig.sys to start RHIDE and open the fdconfig.sys file automatically - but I'd like to show you a bit more of RHIDE's interface. So just type rhide and press Enter.
An "About" window will pop up. Press Enter to clear it. You should now be looking at an empty RHIDE workspace. There'll be a red dot in the middle of the screen - this is the mouse cursor. Bochs instructs you in the bottom left that holding CTRL and pressing down the third mouse button will enable the mouse - but frankly, I've never gotten the mouse to work right in Bochs. So just ignore it - I'm going to teach you to navigate RHIDE using the keyboard.
At the bottom of the screen is a list of shortcuts, there to remind you of the program's most essential keys. Some of the shortcuts are greyed out because we don't have a file open.
Press F3 to open a file.
You could now directly type in fdconfig.sys - white text on green is "highlighted" in RHIDE, and like in Windows, typing with text highlighted (as it is in the Name box) will replace it. Instead, however, press the TAB key once. Now command.com should be highlighted. You're inside a selection box - press up and down to scroll through it. Select fdconfig.sys and press TAB again. You'll see that the text on the Open button will turn white, meaning it's now highlighted. Press Enter and the file will open.
Navigating and typing in RHIDE should be somewhat intuitive - use the arrow keys, page up and page down, home and end to move around. Type to insert text, Delete and Backspace to get rid of it. You can't copy and paste the way you can in Windows, though - in RHIDE, the keys for cut, copy, and paste are:
Next, we'll learn how to use the menu system. There's two ways to open the menus in RHIDE with the keyboard - you can either press Alt, like you can in Windows, or F10. If you press F10, you can navigate the main menu bar with the arrow keys, and press the down arrow or Enter to expand one of the main menus. If you press Alt, you need to press Alt+the red letter of the menu you want to open. For example, if you want to open the Search menu - which we do - you'll notice the S in search is red. So press Alt+S.
The Search menu should open. Press up and down a bit to move through the menu. To perform the highlighted action, press Enter. You'll notice that some menu options have a key combination next to them - this is a shortcut you can type if you want to perform that command without navigating through the menu. The red letters of the menu options let you perform a command without navigating to it using the arrow keys. For instance, pressing F activates the 'Find...' command, even if Find isn't highlighted.
Press 'F' now. We want to find something.
Type FILES into the 'Text To Find' box. Press TAB three times and the 'Origin' radio buttons should light up. Radio buttons let you choose one option from many. Press down to make 'Entire Scope' the selected option, then press Enter. Even though the 'OK' button is not selected, look at how it's coloured differently than the other buttons. This means it's the default button - when you press Enter, even if 'OK' is not selected, RHIDE behaves as though it was. The exception, of course, is when another command button is selected (as opposed to a text box or radio button) - then whatever command is mapped to that button will be executed.
You should now be at the line
!FILES=50
Change this to read
!FILES=200
You can either delete the 50 using the Backspace and Delete keys, or you can highlight it by holding down Shift and moving the cursor over it using the arrow keys. Then press Delete, and all at once it will be deleted.
You'll also need to change the BUFFERS setting to 200. Do this using the same method as we used before.
Hit F2 to save, then Alt+x to exit. You'll need to restart your virtual machine for these changes to take effect - but for now, I recommend just shutting it off. Press Power and take a break. Save the Review for tomorrow.
Table of Contents
RHIDE is a type of program called an IDE - an Integrated Development Environment. It was written by a fellow named Robert Hoehne - RHIDE stands for Robert Hoehne's IDE, of course.
An IDE is a type of program designed for editing, managing, building, and debugging the source code of large programs. We won't be learning most of RHIDE's features - they're pretty outdated and fairly clumsy, so it's mostly useless knowledge. We'll just use it to edit our files.
To start, we need to change a pair of DOS configuration options. By default, only a very small number of files can be open at any one time in DOS. This can be a problem, particularly when compiling - the compiler ends up opening a lot of files behind the scenes without you knowing. So many files, in fact, that the default DOS limit of 20 isn't enough to compile anything but the simplest program. We'll have to fix it sooner or later, and we might as well do it now and get comfy with RHIDE.
(Of course, I could have done it myself, but I thought this would be a good exercise.)
I'm going to assume you're sitting in the root directory of the C drive. Your DOS prompt should say C:\>, in other words.
You have two options now. You could type rhide fdconfig.sys to start RHIDE and open the fdconfig.sys file automatically - but I'd like to show you a bit more of RHIDE's interface. So just type rhide and press Enter.
An "About" window will pop up. Press Enter to clear it. You should now be looking at an empty RHIDE workspace. There'll be a red dot in the middle of the screen - this is the mouse cursor. Bochs instructs you in the bottom left that holding CTRL and pressing down the third mouse button will enable the mouse - but frankly, I've never gotten the mouse to work right in Bochs. So just ignore it - I'm going to teach you to navigate RHIDE using the keyboard.

At the bottom of the screen is a list of shortcuts, there to remind you of the program's most essential keys. Some of the shortcuts are greyed out because we don't have a file open.
Press F3 to open a file.
You could now directly type in fdconfig.sys - white text on green is "highlighted" in RHIDE, and like in Windows, typing with text highlighted (as it is in the Name box) will replace it. Instead, however, press the TAB key once. Now command.com should be highlighted. You're inside a selection box - press up and down to scroll through it. Select fdconfig.sys and press TAB again. You'll see that the text on the Open button will turn white, meaning it's now highlighted. Press Enter and the file will open.
Navigating and typing in RHIDE should be somewhat intuitive - use the arrow keys, page up and page down, home and end to move around. Type to insert text, Delete and Backspace to get rid of it. You can't copy and paste the way you can in Windows, though - in RHIDE, the keys for cut, copy, and paste are:
| Cut | Shift+Del (hold down Shift, then with Shift still pressed, press Delete) |
| Copy | Ctrl+Ins |
| Paste | Shift+Ins |
Next, we'll learn how to use the menu system. There's two ways to open the menus in RHIDE with the keyboard - you can either press Alt, like you can in Windows, or F10. If you press F10, you can navigate the main menu bar with the arrow keys, and press the down arrow or Enter to expand one of the main menus. If you press Alt, you need to press Alt+the red letter of the menu you want to open. For example, if you want to open the Search menu - which we do - you'll notice the S in search is red. So press Alt+S.
The Search menu should open. Press up and down a bit to move through the menu. To perform the highlighted action, press Enter. You'll notice that some menu options have a key combination next to them - this is a shortcut you can type if you want to perform that command without navigating through the menu. The red letters of the menu options let you perform a command without navigating to it using the arrow keys. For instance, pressing F activates the 'Find...' command, even if Find isn't highlighted.
Press 'F' now. We want to find something.
Type FILES into the 'Text To Find' box. Press TAB three times and the 'Origin' radio buttons should light up. Radio buttons let you choose one option from many. Press down to make 'Entire Scope' the selected option, then press Enter. Even though the 'OK' button is not selected, look at how it's coloured differently than the other buttons. This means it's the default button - when you press Enter, even if 'OK' is not selected, RHIDE behaves as though it was. The exception, of course, is when another command button is selected (as opposed to a text box or radio button) - then whatever command is mapped to that button will be executed.
You should now be at the line
!FILES=50
Change this to read
!FILES=200
You can either delete the 50 using the Backspace and Delete keys, or you can highlight it by holding down Shift and moving the cursor over it using the arrow keys. Then press Delete, and all at once it will be deleted.
You'll also need to change the BUFFERS setting to 200. Do this using the same method as we used before.
Hit F2 to save, then Alt+x to exit. You'll need to restart your virtual machine for these changes to take effect - but for now, I recommend just shutting it off. Press Power and take a break. Save the Review for tomorrow.
Wednesday, August 4, 2010
Working With DOS
Start at the Beginning
Table of Contents
DOS (short for Disk Operating System) is the distant ancestor of the modern Windows operating system. When your virtual machine starts up, it'll present you with a prompt that reads C:\>. This means that the current drive is the C drive (the virtual hard drive) and you're currently in the \ or root directory. In general, you'll always work on the C drive, except when I have you load data from a virtual floppy, which will be the A drive - you can switch to it by typing A: and pressing Enter, and back to the C drive by typing C: and pressing Enter. Of course, since you don't have a virtual floppy disk inside your virtual floppy drive, this won't work yet! I'll remind you of how to do this when the time comes.
Like on a modern computer, each disk drive is organized into directories (usually called "folders" these days) which contain files. In order to view the contents of the current directory, type dir and press Enter. If the directory listing is too long to fit on the screen, you can type dir /w (the /w switch is short for 'Wide'), which outputs the listing in three columns. If it's still too long, you can type dir /p (/p for 'Pages', or perhaps 'Paginate'), which will pause outputting the listing when it fills the screen, waiting for you to press a key before it continues. You can also combine the switches (à la dir /w /p) if you're so inclined.
The first thing we're going to do is make a directory to store all our code in. Type in mkdir gameprg and press Enter. This will create a new directory inside the current directory called 'gameprg'. View the directory listing using dir, and observe your new directory.
To change the current directory, you use the cd command. Enter the command cd gameprg and the prompt will change to C:\gameprg>. To go "upwards" into a parent directory, type
cd ..
If you do this inside C:\gameprg, for instance, it'll take you back to C:\.
Whenever you want to stop running Bochs, just hit the power button - in Bochs, not on your real computer! There was no need for a shutdown mechanism back then.
Whenever you want to stop running Bochs, just hit the power button - in Bochs, not on your real computer! There was no need for a shutdown mechanism back then.
Tuesday, August 3, 2010
Setting Up Bochs
Start at the Beginning
Table of Contents
Bochs is, unfortunately, something of a bear to set up. I've done most of the hard work for you, but you'll still need to get involved a little.
Just like in a real computer, Bochs needs a hard disk. Because your computer is a real, physical thing, it has a real, physical hard disk. Because your Bochs "virtual machine" is a virtual thing, you'll need a virtual hard disk. This is a file on your (real) computer, a "hard disk image", that contains all of the stuctures of a real hard disk, plus all of your data.
I've created a virtual hard disk for you that contains a minimal installation of FreeDOS - the free implementation of DOS we'll be using - and DJGPP, the compiler we'll be using to take our source code and translates it into machine code that the computer can execute. Download it here. It's about 40MB.
First, extract 'c.img' from 'hdimg.zip' somewhere. Note - although 'c.img' is only around 40MB zipped up, it expands to around 1GB! That's because it's a 1GB virtual hard disk, of course. It's only so small zipped up because most of it is empty.
Next, put this Bochs configuration file into Bochs' directory. The Bochs default install directory is C:\Program Files\Bochs-2.4.5. If you had Bochs install Start Menu shortcuts like I recommended, there should be a shortcut to "Bochs 2.4.5 Folder" you can click on to find it.
Before we begin, you'll need to make a change to the configuration file - you'll need to tell Bochs where to find your hard disk image. Open the configuration file up in Notepad. If you're on Windows 7 or Windows Vista, you'll need to start Notepad in Administrative mode to do this. Right click on the Notepad shortcut in the start menu and click 'Run as administrator'.
Inside the configuration file, look for the line that says:
ata0-master: type=disk, path="C:\Users\Adam\c.img", mode=flat, cylinders=2080, heads=16, spt=63
You'll need to change the path here to point to where ever you extracted your hard disk image. So if you extracted it to C:\Documents and Settings\George\Desktop\c.img, change the line so that it reads:
ata0-master: type=disk, path="C:\Documents and Settings\George\Desktop\c.img", mode=flat, cylinders=2080, heads=16, spt=63
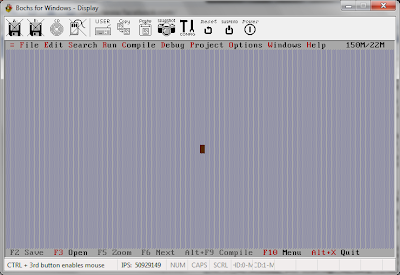
Save the configuration file and run Bochs. Click 'Start' and, if all went well, in a couple of seconds your brand new DOS computer should boot up! It should look something like this:
Previous
Table of Contents
Bochs is, unfortunately, something of a bear to set up. I've done most of the hard work for you, but you'll still need to get involved a little.
Just like in a real computer, Bochs needs a hard disk. Because your computer is a real, physical thing, it has a real, physical hard disk. Because your Bochs "virtual machine" is a virtual thing, you'll need a virtual hard disk. This is a file on your (real) computer, a "hard disk image", that contains all of the stuctures of a real hard disk, plus all of your data.
I've created a virtual hard disk for you that contains a minimal installation of FreeDOS - the free implementation of DOS we'll be using - and DJGPP, the compiler we'll be using to take our source code and translates it into machine code that the computer can execute. Download it here. It's about 40MB.
First, extract 'c.img' from 'hdimg.zip' somewhere. Note - although 'c.img' is only around 40MB zipped up, it expands to around 1GB! That's because it's a 1GB virtual hard disk, of course. It's only so small zipped up because most of it is empty.
Next, put this Bochs configuration file into Bochs' directory. The Bochs default install directory is C:\Program Files\Bochs-2.4.5. If you had Bochs install Start Menu shortcuts like I recommended, there should be a shortcut to "Bochs 2.4.5 Folder" you can click on to find it.
Before we begin, you'll need to make a change to the configuration file - you'll need to tell Bochs where to find your hard disk image. Open the configuration file up in Notepad. If you're on Windows 7 or Windows Vista, you'll need to start Notepad in Administrative mode to do this. Right click on the Notepad shortcut in the start menu and click 'Run as administrator'.
Inside the configuration file, look for the line that says:
ata0-master: type=disk, path="C:\Users\Adam\c.img", mode=flat, cylinders=2080, heads=16, spt=63
You'll need to change the path here to point to where ever you extracted your hard disk image. So if you extracted it to C:\Documents and Settings\George\Desktop\c.img, change the line so that it reads:
ata0-master: type=disk, path="C:\Documents and Settings\George\Desktop\c.img", mode=flat, cylinders=2080, heads=16, spt=63
Save the configuration file and run Bochs. Click 'Start' and, if all went well, in a couple of seconds your brand new DOS computer should boot up! It should look something like this:
Previous
Monday, August 2, 2010
Installing Bochs
Start at the Beginning
Table of Contents
Bochs is a PC "emulator" - software that does what hardware inside a PC normally does. Explaining what exactly an emulator is and how it works is outside the scope of this book - but by the time you get to the end of it, not only will you understand much of the principles of emulation without me even needing to explain them to you, you'll probably have some ideas on how to write an emulator yourself.
Using Bochs, we're going to have a virtual PC running on top of your real computer. It'll have virtual floppy disk drives, a virtual hard disk, and you'll have have to virtually boot it up. When the virtual PC crashes, it only virtually crashes; it won't crash your actual computer - something you'll quickly grow to be thankful for, believe me.
No matter if you have a Windows PC, or a Mac, or even a Linux box, Bochs can run on your computer and create a virtual DOS machine on your desktop. This is another perk of using Bochs.
The only downside is that Bochs is slow - it has to take care of in software what the physical hardware of the PC normally does instantaneously. When a program would normally be telling the CPU to add two numbers together, Bochs instead has to intercept and interpret that message, then tell the real CPU to do it, then report the result back to the program. You're adding a layer of indirection.
This is okay though, because we're pretending that we're developing for a slow computer anyways. Bochs is still more than fast enough for our needs, and because of how low-tech the software on our Bochs machine is, it'll still probably be more responsive than a modern desktop. DOS only takes a couple of seconds to start up, for instance.
Unfortunately, setting up Bochs is tricky on a Mac, and I don't have one right now. The following directions are for Windows PC only. Hopefully I'll have Mac directions up soon. If you're on Linux, the installation process varies depending on the distribution you're running; but Bochs should be in your repositories - and if you're on Linux, you probably don't need me to tell you what that means.
To download Bochs, go to the Bochs website and click on 'See All Releases' in the menu on the left. When I wrote this, I used the latest version of Bochs, 2.4.5. Even if, by the time you read this, newer releases of Bochs are available, I recommend you use 2.4.5 - otherwise, no guarantee on how well my disk images and configuration files will work.
The file you want should be called Bochs-2.4.5.exe. If you're reading this in the
present day, it'll be under Newest Files. If you're from the future, you might need to scroll down and click on the 2.4.5 folder first.
Download the install file and run it. First, it will ask you if you agree to the license Bochs is published under. Legally, I'm obligated to tell you to read it before you click 'I Agree'. There's nothing bad in there, don't worry. If you don't agree to the terms, you can't use Bochs - and if you can't use Bochs, you can't follow along with this book, so a lot is riding on it!
Next, you'll need to choose what components you install. Frankly, it doesn't really matter - even a full install is tiny on a modern computer, and even the most minimal set up will work for our purposes. Here are my recommended settings:

Bochs will then ask you for an install location. The default should work, but feel free to change it if you'd like. If you do change it, be sure to make a note of where you change it to. Once you've set the install location to your liking, click 'Install'.
When the install completes, click the 'Close' button. The Bochs installer will ask you if you want to see a list of changes - if you're curious, go ahead and click 'Yes' - but really, there's no need. Nor do you need to read the README, which it'll ask you about in the next message box. Click 'OK' at the "Thank You" message, and you'll be finished installing Bochs.
Table of Contents
Bochs is a PC "emulator" - software that does what hardware inside a PC normally does. Explaining what exactly an emulator is and how it works is outside the scope of this book - but by the time you get to the end of it, not only will you understand much of the principles of emulation without me even needing to explain them to you, you'll probably have some ideas on how to write an emulator yourself.
Using Bochs, we're going to have a virtual PC running on top of your real computer. It'll have virtual floppy disk drives, a virtual hard disk, and you'll have have to virtually boot it up. When the virtual PC crashes, it only virtually crashes; it won't crash your actual computer - something you'll quickly grow to be thankful for, believe me.
No matter if you have a Windows PC, or a Mac, or even a Linux box, Bochs can run on your computer and create a virtual DOS machine on your desktop. This is another perk of using Bochs.
The only downside is that Bochs is slow - it has to take care of in software what the physical hardware of the PC normally does instantaneously. When a program would normally be telling the CPU to add two numbers together, Bochs instead has to intercept and interpret that message, then tell the real CPU to do it, then report the result back to the program. You're adding a layer of indirection.
This is okay though, because we're pretending that we're developing for a slow computer anyways. Bochs is still more than fast enough for our needs, and because of how low-tech the software on our Bochs machine is, it'll still probably be more responsive than a modern desktop. DOS only takes a couple of seconds to start up, for instance.
Unfortunately, setting up Bochs is tricky on a Mac, and I don't have one right now. The following directions are for Windows PC only. Hopefully I'll have Mac directions up soon. If you're on Linux, the installation process varies depending on the distribution you're running; but Bochs should be in your repositories - and if you're on Linux, you probably don't need me to tell you what that means.
To download Bochs, go to the Bochs website and click on 'See All Releases' in the menu on the left. When I wrote this, I used the latest version of Bochs, 2.4.5. Even if, by the time you read this, newer releases of Bochs are available, I recommend you use 2.4.5 - otherwise, no guarantee on how well my disk images and configuration files will work.
The file you want should be called Bochs-2.4.5.exe. If you're reading this in the
present day, it'll be under Newest Files. If you're from the future, you might need to scroll down and click on the 2.4.5 folder first.
Download the install file and run it. First, it will ask you if you agree to the license Bochs is published under. Legally, I'm obligated to tell you to read it before you click 'I Agree'. There's nothing bad in there, don't worry. If you don't agree to the terms, you can't use Bochs - and if you can't use Bochs, you can't follow along with this book, so a lot is riding on it!
Next, you'll need to choose what components you install. Frankly, it doesn't really matter - even a full install is tiny on a modern computer, and even the most minimal set up will work for our purposes. Here are my recommended settings:
Bochs will then ask you for an install location. The default should work, but feel free to change it if you'd like. If you do change it, be sure to make a note of where you change it to. Once you've set the install location to your liking, click 'Install'.
When the install completes, click the 'Close' button. The Bochs installer will ask you if you want to see a list of changes - if you're curious, go ahead and click 'Yes' - but really, there's no need. Nor do you need to read the README, which it'll ask you about in the next message box. Click 'OK' at the "Thank You" message, and you'll be finished installing Bochs.
Our Development Environment
Start at the Beginning
Table of Contents
CHAPTER I - Getting Started
Modern computers with their modern operating systems (OS, like Windows or Mac OS X) are hugely complex pieces of engineering. In order to even begin to write a C++ DirectX Windows game, you need hundreds of lines of boilerplate code and a deep understanding of dozens of weird technologies. It's not interesting, really, and it's extremely confusing for a beginner.
The advantages are that it's safer - you're unlikely to blow up your computer with the protection Windows provides. You also don't need to worry too much about compatibility - a DirectX game should work on basically any Windows computer, no matter what kind of hardware is inside it.
A mixed blessing is that DirectX and modern graphics cards take care of many of the little details of game programming we used to have to do ourselves. While this is less work, those searching for a deeper understanding of game programming won't really find it. The complex, mysterious machinations of the modern development environment tuck you in and tell you that you'll understand when you're older, basically. While this sort of abstraction is a great thing on the whole, and I have no intention to slight it, I also feel that a deep understanding is crucial to being a truly skilled and capable programmer.
To that end, we're going to travel back in time to around 1992. The 386, running at 33MHz, is becoming the most popular CPU on the market, executing a blistering 11 million instructions per second (MIPS). By comparison, a modern CPU runs at around 3GHz (that's around 100x faster) and executes nearly 150,000 MIPS. Right now we run Windows 7 on our computers - back in 1992, most computers ran DOS, an ultra-minimal, text-only environment. A modern computer might have 4GB of RAM. Back then you were lucky if you had 4MB (around 1000x less). A modern computer has around 1TB of hard disk space. Back then, you might have 100MB - that's 10,000x less! It's on a computer like this that we're going to learn.
Here, we need to do everything ourselves - talk directly to the hardware to make it do our bidding. We'll need to learn the basic math to draw geometric shapes. We'll need to write our own code to unpack images from files. We'll need to carefully feed chunks of sound to the sound card to play music. Only once we get this deep understanding of all the different problems we need to solve in order to make a game can we understand how masterpieces like Doom and Quake were made - and only once we've unpeeled these masterpieces and figured out how people could possibly put them together can we possibly put masterpieces like them together ourselves.
Of course, you probably don't have an old 386 sitting around. Happily we can create a "virtual" 386 using free software, running inside a window on our modern desktops. To do this we'll use Bochs, a free and open source PC emulator, and FreeDOS, a free and open source implementation of DOS. To compile our C code into programs we can run, we'll use DJGPP, a venerable DOS port of the free GCC compiler. This is the same compiler used to build Quake nearly 15 years ago, and it's only gotten better since.
Sunday, August 1, 2010
Introduction To Volume I
Start at the Beginning
Table of Contents
Volume I is a look backwards to the origins of PC game programming. Although we're not going all the way back to the primordial ooze of x86 assembly and CGA register hacking, we're going back far enough to give you an idea of what it's like to do it all yourself - living with minimal support from the operating system, directly poking and proding at the hardware, writing your own rasterisation routines, and so on. This environment is much simpler, making it easier to learn on and understand. But it'll also put hair on your chest. It's a world without shortcuts - where if you want anything, you'll need to squeeze it out of the hardware with your bare hands. It teaches both the skills and the mindset that you'll need to be a serious game programmer. It's very much a first principles sort of thing.
Little knowledge is presumed. Of course, the more you have, the easier going you'll find things. The most important thing is to take the material slowly and carefully, rather than skimming through; I'm going to make it a point to explain everything as it comes up in detail, rather than just gloss over matters to expedite things. We're going to learn low-level details about the PC hardware, some pretty cool math, and the C programming language, amongst other things. The aim is to be comprehensive and complete. My hope is that a clever but completely uneducated kid would be able to work through this book by themselves on the weekends and come out of it with the skills needed to make the next Quake. You'll need to be able to solve basic algebraic equations, and that's about it.
I love theory but hate learning theory. My preference is to never introduce a topic via a long, dry explanation of its precise semantics; instead, I'll try to explain it as I go in the context of a practical application. Even when I do feel the need to explain something before you see it in action, I'll try to make sure there's always a practical application at least in mind. It's similar to immersion style courses for language learning, which I've always found effective; it's easier to learn something precisely after you have an intuitive understanding of it.
This is primarily a course on code reading, a woefully underappreciated skill. Instead of forcing you to write your own code unequipped with the knowledge of how to do it properly, you'll instead be asked to closely and carefully understand complete, practical code samples. These heavily-annotated code samples introduce and explain most of the key concepts in the book. The size and complexity of the programs presented for reading accelerates quickly; this aggressive immersion is necessary, given the depth and breadth of the material presented, to get the reader up to speed quickly. Everything will be recapitulated in a review section at the end of each chapter; take a day before reading them and they'll reinforce the preceeding material.
This is the beginning of a long, hard journey. Take your time. Take things slowly. We're lucky to live in the age of Google and Wikipedia - research things you don't understand or are curious about. Play around with the code. Have fun. That's what games are all about.
Table Of Contents
GAME PROGRAMMING FROM THE GROUND UP
Forward
VOLUME I
Introduction to Volume I
CHAPTER I - Getting Started
Forward
VOLUME I
Introduction to Volume I
CHAPTER I - Getting Started
ii. Installing Bochs
iii. Setting Up Bochs
iv. Working With DOS
vi. Chapter I Review
CHAPTER II - Mode 13h
iv. Colour Depth
v. Mode 13h
ix. Double Buffering
x. VBlank
Saturday, July 31, 2010
Forward
When I was young, there were few things I wanted to do more than make computer games.
I was kind of a dorky kid.
But back then, making computer games wasn't really practical for a kid. Compilers alone would set you back $100. There was no internet - not the way there is now. Scraps of knowledge were passed along from hacker to hacker. Excellent books existed - books like André LaMothe's Tricks of the Game Programming Gurus and Michael Abrash's Graphics Programming Black Book. But they were hard to find, hardly comprehensive, and never aimed at true beginners. You needed knowledge of C, and PC hardware, and assembly language, and advanced math...it was hard to know where to start.
Things are dramatically different now. Anyone can download Microsoft's XNA libraries and a freeware version of Visual Studio and learn to make a game in a couple of hours. All the details are abstracted over. Loading and drawing an image takes a few clicks of the mouse and a couple of lines of code, and from there you can have a finished game in hours.
But things aren't that simple, really. Later in this book I'll devote an entire chapter to what XNA lets you do in seconds. True, XNA hides all the challenge from you. But also all the joy.
Because, yes, shifting bits and bytes around is a joyous game on its own - especially when it results in the creation of something as beautiful as a computer game. And while I have nothing against the abstraction XNA is trying to provide, sooner or later these kids are going to hit a wall. XNA can't make everything easy, and unless they really understand the problems one encounters when making a game - expressing oneself in an interactive medium, really - they're going to feel limited, and their games are going to feel limited.
That's why I'm writing this book: I want to write the book that I always wished was there for me as a kid - a book that will help someone else make their pixelated dreams glow. And I want it to be freely available online, so anyone - even kids without a credit card - can learn from it.
This book is set up like a university program, with each volume corresponding to a year of study. The first volume is like a survey course, designed to get you up to speed and fluent in the subject as quickly as possibly. The two middle volumes are exegetical courses, where we study in-depth two "great works" - the source code to Doom in Volume II, then Quake in Volume III. The fourth volume is like an independent study project, where - with assistance - you'll be constructing a modern game engine of that magnitude on your own.
Computer game programming is probably the hardest type of programming there is. If you're one of the developers behind the Unreal Engine 3, you need to write code that never crashes, runs on three or more platforms, is highly extendable by licensees, is agressively optimised, and uses the most cutting edge technology and techniques known. And you have to do this under a strict deadline, working upwards of 80 hours a week.
But game programming can also be intensely satisfying, imaginative work. Creating a game is like playing jazz - technical, but soulful. I want to saturate the world with games made by dreamers, brilliant in their conception and immaculate in their execution. And it's only possible if the secrets behind making games aren't hidden away.
So here they are. Pick them up. You'll need to enthusiasm, some dedication, and some smarts. They are your spades and hoes. Carve into the earth, plant your inspiration, and from the ground something beautiful will grow.
Subscribe to:
Posts (Atom)